
Apple iPhone X tips & tricks
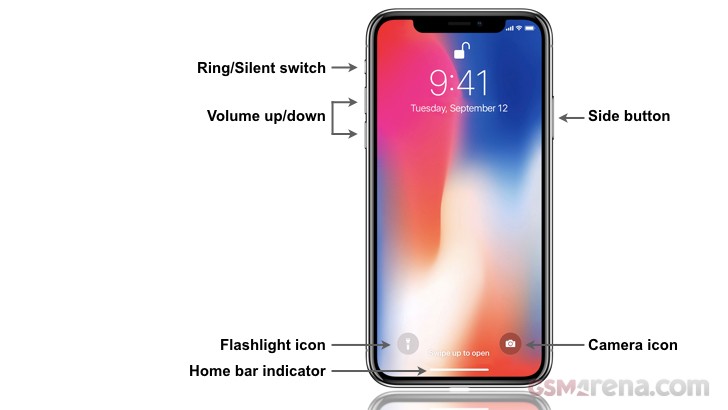
Whether youve got your iPhone X, are still waiting for your pre-order or just biding your time, let us share with you some tips and tricks that will help you make better use of it. In fact, some of those are general iOS 11 tips, so they might be of interest to other iPhone owners too. : In addition to pressing the now enlarged side button and Raise to Wake, you can now tap the screen to wake the iPhone X. Enabled by default, go to select to enable/disable. : Press both the side button and either volume button until the slider appears, then slide to power off. While not unique to the iPhone X, Apple introduced a new way to shutdown your iPhone with the iPhone 7 & 7 Plus with their new haptic Home Button. Go to and scroll down to the bottom, select to power off. : Turn the flash Light on and off by force pressing the camera icon. The camera can be invoked by either the traditional swipe to the left or by force pressing the camera icon. : Now by default, notification content that appears on the lock screen is kept secret until the owner looks at the phone and Face ID identifies you. Dependent on the circumstances you may want to see the notification content appear, for example whilst youre sat at a desk without having to pick up your phone so Face ID can identify you. To always see your notification previews Go to and select . : In addition to saying Hey Siri you can now press and hold the side button to invoke Siri. : Lightly press and hold any app icon to enter 'wiggle' mode. Move and arrange your icons as required. Press in the upper right. Some people don't see this immediately due to the notch and this seems to be a non standard use of the space by the notch. : Double-clicking the side button now invokes Apple Pay and displays your default credit card. Glance at your iPhone X to authenticate with Face ID and then hold the iPhone X near the card reader. : Due to the loss of the home button this is now selected by pressing the side button three times quickly. To enable, go to select to enable. In addition you can select Auto-Brightness to adjust the brightness and contrast based on the ambient light settings. : By default, pressing and holding the side button and either volume button will activate Emergency SOS. You can enable the ability to rapidly press the side button five times for even more convenience requiring only one hand. To enable, go to and select . If you have a Medical ID created, your emergency contacts are also alerted along with your location. : You now see less status information along the top of the screen due to the loss of real estate taken up by the now infamous notch. Upper left shows time and location services icon. Upper right shows cellular, Wi-Fi strength indicators and the battery icon. : Swipe down from the upper right. You can also use this gesture to peek at additional status information that was traditionally always shown, including your cellular carrier name, battery percentage, Bluetooth and alarm status. Apple iOS has a built in battery widget, unfortunately it only shows once you have paired a Bluetooth compatible device that feeds back its battery status to iOS for example, Beats X headphones. Alternatively, several battery widgets are available to download from the app store. : Once your iPhone X is awake, unlock by glancing at your screen and swipe up from the bottom of the Lock screen. : Go to the Home screen at any time by swiping up from the bottom edge of the screen. Swipe up from the bottom edge of the screen and pause halfway up the screen, your current app will be joined by the other open apps, now let go. Navigate and select the app you wish to switch to. To close apps touch and hold an app until red circles with minus signs appear on the top left of each app either press minus sign om each app to close or swipe app up off the screen. : In addition, when in a App, swipe right on the Home Bar (black or white dependent on the screen background) / bottom of the screen to navigate to the last used app. This even works on the Home screen when the Home Bar isnt shown. Swipe left and right on the home bar to move through your open apps. Once an app has been selected, the option to swipe to the left is no longer available. : Since the iPhone 6 came to be, you had the option to pull down the screen to reach the top elements without re-adjusting your grip by double touching the Home buttons Touch ID sensor. Apple still offers that reachability on the iPhone X even with the button gone. Turned off by default, to enable go to and select to enable. Be warned, this takes some getting used so keep persevering until you nail it. : Take a screen shot by pressing and holding the side and volume up buttons. : Make sure youve got the latest version of the YouTube app. The recent update allows content to be zoomed to fill your iPhone X screen by a pinch gesture. You'll be seeing the central part of the video with bits on top, bottom and the left missing, but some clips work fine that way. Animojis are currently limited to 10 second clips, but you can string several clips together. Save you recorded Animoji from the iMessages app by lightly force touching on the Animoji and sliding up to reveal the options. Select . This will save the clip to photos app. Clips are recorded at 640 x 480 at 60fps so quite usable. Record and save as many clips (Karaoke Animoji) as you would like. Download the Apple iMovie app (or a similarone) and create a new project, select the Animoji videos you require from the Videos photo Album and create your next Animoji Taylor Swift video. Cant live without the home button? Heres a pseudo virtual home button for you. This not new but now may be more relevant than ever. Go to select to enable. Now select . This allows you to specifiy the number of floating buttons the appear on the screen. Press the minus button at the bottom of the screen until 1 icon remains. Touch the one remaining icon and select and press . Select , we will now assign the traditional pre-iPhone X Home button actions. Select and select and press to go back. Select , select . Select and select snuck this one in to get even easier access to Control Center. Select and select . You could swap the and actions around based on your personal preference. You can make the button more prominent by selecting and moving the slider to 100% Drag the virtual Home button to place at the bottom of the screen or in a location of your choice. If needed, there is nothing preventing you from dragging the icons out of the dock at the bottom of the screen to give your new virtual home button room to breathe. : If you use Apple Keychain to store all your credentials you can use Face ID to verify your usernames and passwords within Safari. : Apples office suite Apps which include Apple Keynote, Numbers & Pages now use Face ID to secure files. : As per iWork, individual notes can be secured with Face ID. Just like Touch ID, while not recommended, youre not forced to use Face ID to unlock your phone. To disable Face ID go to . Enter your passcode. Select to disable Face ID. From here you can also disable the use of Face ID for and . I always recommend to make your passcode more robust by changing your passcode from a 4-digit numeric code to either a custom numeric code or a custom alphanumeric code. Go to . Enter your old passcode. Before you enter a new passcode select just above the keyboard. Select either a (Letters and Numbers) or (Numbers only). : This is an additional level of security by verifying that you are looking at the iPhone X before unlocking. This is focusing on the eye area and not just the face. You can disable this if you dont want Face ID to require that you look with your eyes open at the iPhone X. In theory this could speed up recognition and helps with blind users or users that have low vision. To disable go to and select to toggle on or off While youre looking at the display, the screen will not be dimmed and the volume of alerts will be lowered. To disable go to and select to toggle on or off. These features work even if you haven't enrolled in Face ID and as theyre related to Accessibility they can also be accessed from . I've already covered this in my recent article but heres a little more detail. Some of you have embraced the notch, others not so much. To make it less obvious, you can create a lock screen and home wallpaper that draws less attention the notch. However, when youre in apps the notch visibility will still be wholly dependent on whether full screen content is being viewed, in what orientation and dependent on how developers are updating their apps to cater for the new screen layout. I created a wallpaper template with a black layered mask at the top of the screen to emulate the curved edges symmetrical to the ones at the bottom of the iPhone X OLED screen. In the case of the demo I applied this layer over a new iPhone X specific wallpaper from iOS 11.2 Beta 2. Once your new wallpaper is on your iPhone X you need just a little patience when setting your new wallpaper within , as a little moving and pinching is required to align it perfectly to just obscure the notch but it's worth the effort for the effect. To further complete the effect, when setting your wallpaper, select as opposed to Respective and reduce iOS animations by selecting and select to turn on. When both these options are selected the notch is virtually invisible when on the Lock and Home screens. The full wallpaper we used is shown below. You can download it by . To create our notchless wallpapers, we used Pixelmator on a Mac to create the template. You can download it by . We exported a Photoshop version which you can download by . Well not exactly. Remarkably for their first OLED iPhone, Apple has yet to see fit to introduce a true dark mode. OLED screens use less power when the content being displayed is black due to those pixels being truly turned off. So, until we see this feature appear in iOS 12 you can utilize iOS 11s Smart Invert. As this isnt a true dark mode your results may vary. Go to and select to enable. Additionally, setting your iPhone X Lock Screen & Home Screen to a black wallpaper will turn off those battery draining pixels more often. Go to and scroll down to the bottom of the screen and select the all black wallpaper. For maximum effect, select to set both the Lock Screen and Home Screen to black. We have not yet performed a test to see how much extra battery life you are gaining with those last two tips, but we'll try and do one next week and get back to you. If you use iOS 11s new Screen Recording option from with Control Center you may have noticed that your recorded videos have a red recording bar along the top of the screen. For the iPhone X the recording bar is now a red bubble filling the top left of the screen. While convenient to record your screen this way you may not want to see the red recording bar or bubble in your creation. If you have a recent Mac however you can record your iPhone or iPad screen directly. Simply plug your iPhone/iPad into your Mac with an approved lightning cable. Launch QuickTime Player. Select . When the recording window opens, select the down arrow v located just next to the record button. From the pop-up you can select your iPhone/iPad to record from, sound source (great for voice overs) and the video quality. The resulting video has no red recording & time left indicator. One of the lesser known ARKit implementations within iOS 11 can be found in Apple Maps. If a city is 'Flyover' enabled, when you select you are immersed in a Augmented Reality version of Flyover. As you move the phone around you can zoom and out with a pinch gesture. You'll need a steady hand and a fast connection but it's a good technology demo if nothing else. Touch the screen and select to start the 'flyover' tour of your selected city. See the video below for a demo of this. The video was recorded using the previous tip to record an iPhones screen via a Mac.


0 comments:
Post a Comment